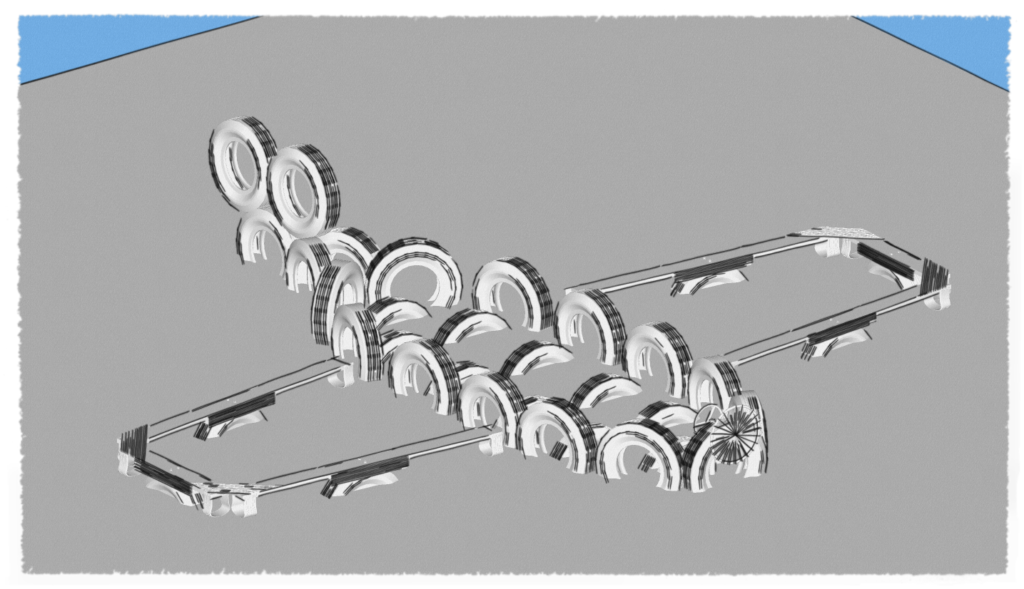
Design Description
This design utilizes various ground elements for various types of play such as imaginative play, jumping on tires, climbing tires, and balancing on beams.
Building Steps
1. Weld the strips of steel onto the end of the steel pole in a radial fashion, and weld the opposite end of the steel strips to the steel ring to create the propeller.
2. Weld the steel tubes between the 42 cm / 16.5” ring to create the steering wheel.
3. Drill a hole through steel tube F. Hole should be slightly larger than steel tube E so that steel tube E can be inserted through steel tube G.
4. Cut out a hole through the sidewalls on opposite sides of one truck tire. The hole should be slightly larger than the diameter of steel tube D so that steel tube D can be inserted through the cut-out holes in the tire.
5. Insert steel tube D from step 1 through the cut-out in the car tire sidewalls from step 4 and the wider steel tube from step 4. Then, weld the steering wheel assembly from step 2 onto the end of steel tube D.
6. Drill two holes at the shoulder of the truck tires at ~128 degrees, and then bolt together with hex bolts, nuts, and washers. This assembly will be attached to other tires for the bottom half of the aeroplane’s tail.
7. Drill two holes at the shoulder of the truck tires at 30 degrees, and then bolt together with hex bolts, nuts, and washers. This part is the midsection of the lower part of the aeroplane’s tail.
8. Connect the closed end of the tires from step 6 to open end of the tires to step 7, and connect the closed end of the tires from step 7 to one truck tire. Then, drill holes at the contact points, and attach them together with bolts, nuts, and washers.
9. Lay out the tires for the cabin of the plane, the seats, the tire with the propeller and steering wheel, and the lower half of the tail on the ground and mark the ground to determine where to dig. Next, remove the tires and then dig the holes. Then, fill in the holes with soil, but leave the holes for the tail to make it easier to attach the top half of the tail next. Please note that the tires must be buried at least half way into the ground to better secure the tires. Distance between the seats can be arranged to better fit your space.
10. Place two tires over the tire assembly from step 12. Next, drill holes through the tire treads where the tire treads are touching. Then, attach the tires together with hex bolts, nuts, and washers.
11. After the tires are attached for the tail, fill the holes in with soil and tightly pack it down.
12. Drill two holes through the plank into the tires at the center of the plank, and then connect the tire and plank together with bolts, nuts, and washers.
13. Cut the sidewalls off six car tires.
14. Cut through the tire tread. First, use a utility knife to cut the rubber of the tire tread until you reach the steel wire. Next, use a thin metal blade grinder to cut through the steel wire. Then, cut the rest of the rubber with the utility knife. Finally, use a thick grinder blade to smooth the surface. Run your finger along the surface of the cut to make sure it is smooth.
15. Place the half cut tire tread along the side of the timber posts. Next, drill two holes through the tire treads. Then, attach the tread to the posts with bolts, nuts, and washers.
16. So that children’s fingers do not get pinched, place the tire treads along the timber posts. Next, drill four holes along the tire treads into the wood. Then, attach the tire treads to the wood with bolts, nuts, and washers.
17. Place a cut tire tread over the ends of the wood planks at each corner. Next, drill holes through the tire tread and wood. Then, connect the tire tread and wood together with bolts, nuts, and washers.
18. Bury the seesaw assembly from step 19 into the ground. The bottom tire should be buried about half way into the ground to better secure the tire.
Materials
• x 104 Hex bolts with nuts and washers
• x 40 Lag bolts with washers
• x 14 Car Tires
• x 35 Truck Tires
• x 1 Steel Ring; Diameter=~42 cm / 16.5”
• x 1 Steel Ring; Diameter=~70 cm / 27.5”
• x 4 Wood (A); Length: ~350cm / 178”, Width: ~25cm / 10”, Height: ~5cm / 2’’
• x 2 Wood (B); Length: ~175cm / 69”, Width: ~25cm / 10”, Height: ~5cm / 2’’
• x 24 Steel Plate (C); Length: ~32cm / 13”, Width: ~3cm / 1.25Height: ~2cm / 0.8’’
• x 1 Steel Plate (D); Length: ~52cm / 21”, Diameter: ~3cm / 1.25’’
• x 3 Steel Plate (E); Length:: ~17cm / 15.7”, Diameter: ~3cm / 1.25’’
• x 3 Steel Plate (E); Length:: ~90cm / 35”, Diameter: ~7cm / 3’’
Tools
• Pen/Pencil
• Tape Measure
• Drill and Bits
• Utility Knife
• Grinder
• Spanner
• Spade
• Welder
• Water
This plan is designed to be used in conjunction with your appropriate safety guidelines / standards and the advice of local skilled builders / engineers. If your location has no guidelines or standards, we have provided a summary of many of the most common hazards here.
This plan is for pre-school (4+) and school-age children, and are not designed for babies and toddlers. Designs will need to be redesigned for these age groups.
This element needs soft fall below it in the safe fall zone.
This element can have overlapping safe fall areas.
This element must have a clear safe fall area of 5’ (150cm) around it.
Depending on the size of the tires this element may contain an entrapment hazard. All spaces more than 23.5″ (600mm) from ground level must not be between 3.5″ (89mm) and 9″ (230mm) in diameter in any direction.
All tires need to have holes drilled or cut at their lowest point to ensure good drainage. This will reduce the risk of mosquitos and their associated issues, such as malaria, etc.
**IMPORTANT** Please see safety guidelines here for further details on the above safety points.
LIABILITY DISCLAIMER and CREATIVE COMMONS LICENSE WORDING
This LIABILITY DISCLAIMER and CREATIVE COMMONS LICENSE WORDING is offered for support, guidance and advice only and should not be relied upon in place of professional or expert advice. We make no representation or warranty of any kind, express or implied, about the completeness, accuracy, reliability or suitability with respect to the LIABILITY DISCLAIMER and CREATIVE COMMONS LICENSE WORDING. Further, Playground Ideas make no representation that this LIABILITY DISCLAIMER and CREATIVE COMMONS LICENSE WORDING adhere to any safety standards in your country and therefore each project/playground built should be assessed on an individual basis in order to ensure compliance with national safety standards in the applicable country.
To the maximum extent permitted by law, in no event will Playground Ideas be liable for any loss or damage including without limitation, direct, indirect or consequential loss or damage, loss of profits or loss of opportunity arising out of or in any way connected with the any person acting or refraining from acting in reliance of the LIABILITY DISCLAIMER and CREATIVE COMMONS LICENSE WORDING or for failure to comply with the national safety standards in the applicable country, whether based in contract, tort (including negligence), strict liability or otherwise.
This work is licensed under the Creative Commons Attribution-NonCommercial-NoDerivs 3.0 Unported License. This means if you use or feature this work in any website, publication, presentation etc, you must clearly attribute/ credit the work to www.playgroundideas.org (but not in any way that suggests that PlaygroundIDEAS endorses you or your use of the work). You may not use this work for commercial purposes without explicit permission. You may not alter, transform, or build upon this work but you may create and add new work to the PlaygroundIDEAS design library to share. To view a copy of this license, visit http://creativecommons.org/licenses/by-nc-nd/3.0/.